
Nothing is more annoying than discovering your recently bought replacement windows are too small. Knowing how to measure a window for replacement might help you avoid this uncomfortable situation and avoid needless anxiety. Once you know the right procedures, this seemingly difficult task can be completed quickly and easily, saving you money and time while guaranteeing a tight fit for your new windows.
Maintaining the structural and insulating integrity of your home depends on precise measurements. Additionally, it improves the aesthetic appeal since properly fitted windows improve the overall appearance of your room. Precise dimensions are important from both a functional and design standpoint, thus knowing “how to measure a window for replacement” is crucial when starting any remodeling job.
When you embark on the task of adding new windows to your home to give it a revitalizing makeover, keep in mind that perfection requires paying close attention to every little detail related to dimensions.
What are the Parts of Window Frame
A complete and interactive understanding elucidates the components of a window frame in detail.
• The Head: Appropriately named, it is positioned at the top of window frames.
• Jamb: These are side parts that provide a border for securing the main sections of windows and run vertically along each side.
• Sill: The bottom of the frame, usually tilted outward to allow water to properly drain off your window, is referred to as this.
• Mullion: A structural bar that separates neighboring windows
• Muntins or Glazing Bars: Glass panes within a single window frame are divided by lovely design features that resemble grids.
How to Measure a Window for Replacement
Demystifying Window Measurements
Replacing a window demands meticulous attention to detail from start to finish. Inaccuracies in your measurements could result in something that doesn’t fit quite properly, similar to custom ordering a suit. Therefore, it is crucial to understand how to measure a window for replacement. The width, height, and depth of the windows are important measuring factors; precise measurement guarantees that your new windows will fit perfectly into their intended locations.
Right Tools for the Task
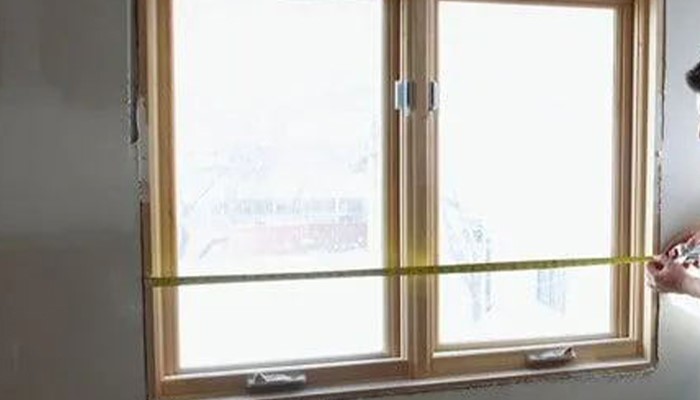
All you need to start designing your own home repair project is a notepad and a steel measuring tape. Important measurements include determining the width by going jamb to jamb across the top, middle, and bottom of the windows; the height is determined by measuring vertically from the sill to the head jamb. This ease of use dispels the myth that replacing windows requires expert assistance; you are fully capable of handling this task.
Seeing Depth Beyond Surface
Early builders included a variety of forms and dimensions expansions outside the plane of walls to guarantee comfort was increased without sacrificing aesthetics, giving rise to what are now known as Windows bay or bow buildings. As they gracefully emerge from the exterior, there’s more to them than what first meets the eye. They reveal an additional quality known as “Depth” that can only be obtained by transcendental means.
Precision Makes Perfect
Do you recall the well-known proverb “Measure Twice, Cut Once”? This brings us to our next important lesson, which is to never settle after taking measures just once. Measure everything at least twice to ensure accuracy and prevent costly errors that are commonly missed by amateurs but have a negative impact on the effective installation of window replacements.
Rough Opening vs Actual Window Size
The final, but certainly not least, step in selecting replacement window sets that fit properly is to comprehend the distinction between rough opening and actual window size. Known as the “dark horses,” these windows are frequently disregarded by homeowners, yet identifying them can lead to genuine proficiency when measuring windows for replacement. Examining these subtleties gives you a better knowledge of environments that you could glimpse but never really understand.
How to Measure a Window for replacement Glass
When you have patience, accuracy, and a basic tape measure on hand, the technique is not at all difficult.
Note that for greater precision, measurements should always begin inside the trimming and not from edge to edge of the original glass. Record the width at three separate points: the top, middle, and bottom. Then, average the data to account for any minuscule variances in dimension.
In a similar vein, determine height by selecting values from the left, center, and right sets, then averaging them all. Remember to allow for a small amount of wiggle room when ordering the specifications of your replacement pane. Reduce each measurement by 1/8th of an inch to enable a smooth installation without putting undue pressure on the surrounding glass of your replacement window.
Conclusion
Precisely measuring a window for replacement calls for close attention to detail and is an important undertaking. As long as you follow the instructions in this article, you should have precise measurements to make sure your new windows fit well. Don’t forget to take numerous measurements of every measurement and account for any anomalies or special characteristics of your window spaces. Remember that if you’re not confident you can take these measurements yourself, it’s acceptable to acquire professional assistance. Now go ahead and get your materials, get to work measuring, and install new windows to improve the visual appeal and energy efficiency of your house.